


Hot Tub Patio
Spring has spring and it’s time to brighten up our outdoor living spaces. One frequently used spot may be your hot tub. And there’s no reason you can’t provide that space with a set-in-garden appeal.
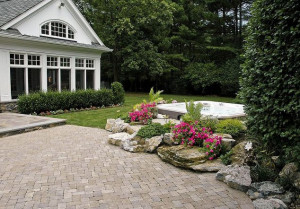
The photos we’re sharing today are those of a Best Hot Tubs client. As you can see, their hot tub’s installation appears like it’s set in a natural berm, or small hill, surrounded by plantings.
With that in mind, here’s a 6-Step DIY outline for creating just that sort of spring look for your own hot tub.
Creating a DIY Set-in-garden Look
If you already have a hot tub, you can ignore Steps 1, 2 and 3 below.
Step 1. Before your hot tub arrives, be sure you’ve checked any relevant building codes in your area to determine how far away a hot tub must be from your home.
Some areas require a hot tub be at least five feet away from the house and from your property lines, for example.
Step 2. The spot you choose for your hot tub should be at least 10 feet across and 10 feet wide, although this depends on the size of the tub that you choose. You must allow for enough room to be able to climb in and out of your hot tub safely. Consider creating a path to and from your house so as not to bring dirt into your spa’s water.
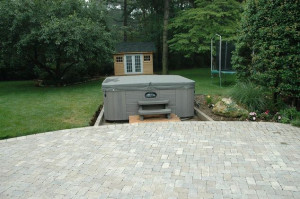
Prepared Site for Installation
Step 3. Site Preparation: Should you be handling the installation yourself, before delivery, choose a location for your hot tub that is convenient and prepare it to allow for drainage.
You’ll find in your spa manual the exact size of your hot tub. If you are installing it on the ground, cut out turf grass in the shape and dimensions of your new hot tub. Then, using a wheelbarrow, bring in gravel and smooth and level it out.
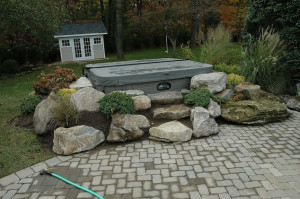
Adding Soil/Stones
Step 4. Now for the fun part, creating the set-in-garden look. Start by creating a hot tub “vault.” Since you will be using top soil for your plantings and garden look, you don’t want that soil touching the tub. Place either concrete blocks or pressure treated ties around three sides of your hot tub to hold back the soil. (The fourth side of the tub should face the back leaving ti exposed. This is where the spa’s access panel is for reaching its inside equipment.)
Step 5. Soil: For this particular design you might need about 5 or 6 yards of top soil and about one ton, or approximately 2,000 pounds of moss rock boulders. Build up the soil around the 3 sides of the hot tub, placing boulders in a natural way. You can also use boulders for steps to complete the setting.
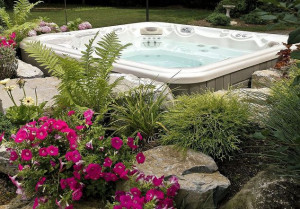
Adding Plants
Step 6: Plants: For this project, they used procumbent (or spreading) juniper and gold thread cypress, ferns, lirope, hostas, hydrangeas, variegated red twig dogwood, and some grasses in back side.
The pretty pink flowers are waze petunias that flower all summer long.
Note: You might wonder if Best Hot Tubs does these custom installation ourselves. Actually, in most cases, we work closely with local contractors. But it is important to note that Best Hot Tubs owner, Bill Renter, owned a well-known Long Island landscaping firm for over 30 years. His knowledge of what’s required for this type of special installation, as well as other more challenging designs, is why many people choose to come to Best Hot Tubs.
“I continue to work closely with landscaping designers for a variety of hot tub installations,” says Bill. “It certainly is helpful that I know exactly what is required, no matter how complicated the clients’ requests are — including in this case, the proper plantings and rocks that create a perfect set-in-garden design.”
That’s it. Happy hot tubbing and happy spring!
